Setting Up Web Filtering & Shielding for Home Computing
by Dennis Halnon of TAB Computer Systems, cohost of Computer Talk with TAB
Web shielding & filtering typically operate outside of your computer (and even outside your network) and protect your computers from going to Internet sites that might be harmful. They work by checking the sites your computers try to reach and intercepting those requests when it’s necessary.
For years, we’ve recommended OpenDNS, which is now owned by Cisco and is a free-for-home-use version of the Web-shielding product they sell to businesses. This is not software you install on your computer, per se. Instead, it’s a setting you add, either in your router or in the computer’s own network stack.
Brief note: The terms “router,” “firewall” and “access point” are sometimes used interchangeably. Regardless of what it’s called, the term “router” is used below to describe whichever device distributes Internet connectivity in your home.
Configuring and Managing OpenDNS on Home Router
OpenDNS is not the only such product that’s available, but it is one that offers some management functions for home users, and is free for them. Here’s how to get it set up for yourself:
- Configure your home router to distribute OpenDNS’s DNS server settings to any devices that connect to your network; these are LAN and/or DHCP settings in the router’s configuration interface
- OpenDNS’s DNS settings are: 208.67.222.222 (primary) and 208.67.220.220 (secondary)
- It’s possible to use only one of these sets of numbers, but Internet-connected devices generally work better if they have both
- You can set computers manually and individually to use OpenDNS (more on that below); but it’s best to configure it in your router, so that all devices that connect to your network use it, without having to do anything special on any of them
- How you go about this, depends on your make and model of router; each brand and product line has its own style of interface for entering these settings
- Find the local IP address of your router by hitting Windows-X, click “Terminal” or “Command Prompt,” then in the box that opens, type “ipconfig” (no quotes) then hit Enter, look for a specific item called “Default Gateway”; that value is your router address
- Unfortunately, the OpenDNS tech support site no longer has information about how to work with various routers’ interfaces
- Here is a ChatGPT session you can use in place of that; at bottom there’s an option to ask about your specific make and model of router: https://chatgpt.com/share/691893f0-9e04-800a-8804-d20fd2ad2d81
- Here’s a Copilot session that offers the same information: https://copilot.microsoft.com/shares/sfPj9bY8mShc3ybE3wxni
- If you’re able to configure your router to distribute OpenDNS to all devices, you should be all set, just restart your computers and phones
- You’ll also want to flush their local DNS caches
- Do that on a Windows PC by hitting Windows-X then click “Terminal (Admin)” or “Command Prompt (Admin),” then type “ipconfig /flushdns” (no quotes, and include the space before the slash) and hit Enter
Note: If you’ve done the above and configured your home router to distribute OpenDNS to allow devices on your network, you can proceed to the “Making the Most of OpenDNS” section below. Configuring a computer individually for OpenDNS is merely optional, but offered here in case you’re interested.
Configuring OpenDNS on Computers, Individually
If you wish, you can set your computer manually to use OpenDNS settings. To do this, assuming you have Windows 11:
- Hit Windows-X then click “Network Connections”
- In the window that comes up, click on your network type, which will be “Ethernet,” “Wired,” or “LAN” (for a wired network) or “Wifi” or “Wi-Fi” (for wireless)
- Scroll down a bit to “DNS Server Assignment” and click the “Edit” button to the right of it

- At top of the new small window that comes up, click on the picklist immediately under “Edit DNS Settings” then click “Manual”
- In the “IPv4” section, set “Preferred DNS” to 208.67.222.222
- Set “DNS over HTTPS” to “On (manual template)”
- In “DNS over HTTPS template” enter: “https://doh.opendns.com/dns-query” (no quotes)
- “Fallback to plaintext” should be “On”
- Set “Alternate DNS” to 208.67.220.220
- All the DNS over HTTPS options should be the same as above
- It should look similar to this:
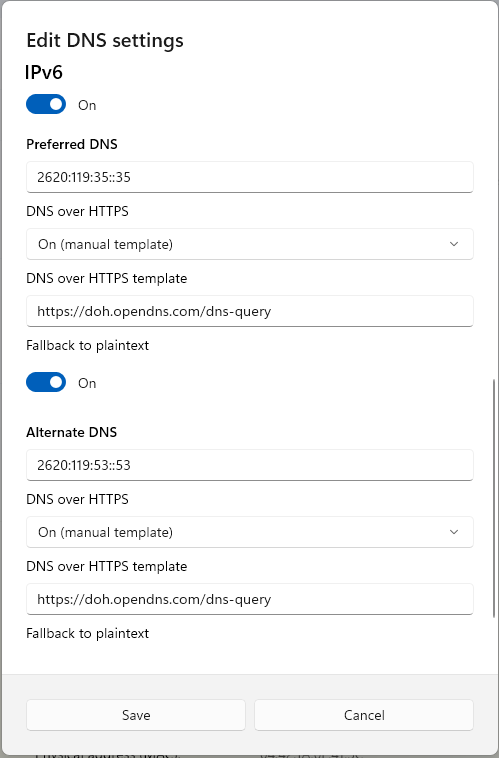
- In the “IPv6” section (scroll down to get to it), set it to “On” with “Preferred DNS” to 2620:119:35::35
- Set “Alternate DNS” to 2620:119:53::53
- For each of these, set the “DNS over HTTPS” settings the same as you did above
- That’s with it being “On (manual template)” and with “DNS over HTTPS template” set with “https://doh.opendns.com/dns-query” (no quotes) and “Fallback to plaintext” set as “On”
- Click “Save” button at the bottom of this settings pane when done
- See steps 11 and 12 in the “Configuring and Managing OpenDNS on Home Router” section above, to flush the local DNS cache now that you’re using OpenDNS
Making the Most of OpenDNS
However you have set your computer (or computers, assuming you configured DHCP in your router to distribute OpenDNS server settings to all devices), the next step is to register with OpenDNS and configure at least one computer on your network to update the service regularly with your external (or WAN) IP address.
This allows the OpenDNS service to know which network belongs to you and you’ll then be able to use it to manage Web filtering. To do so:
- Go to this Web site: https://support.opendns.com/hc/en-us/articles/227987867-What-is-the-OpenDNS-Dynamic-IP-updater-client
- Download the installer for your computer (there’s a Windows and Mac OS installer for the OpenDNS updater)
- Run the installer (don’t worry, it’s quick)
- At the end of installation it will ask you for your email address and password, to connect with the OpenDNS management service
- You don’t have those credentials yet, so click the link to create an account
- Follow directions at the OpenDNS site to set up your account
- Once you’ve created credentials, add them to the updater and allow it to login
- It will show that it has updated OpenDNS with your current external IP address
- This is necessary since home Internet modems are “dynamic” and your IP address will change from time to time; perhaps as often as daily, or up to 2 weeks, or however long your ISP has set your service up
- Go to the OpenDNS dashboard for your account, at https://dashboard.opendns.com/
- It should look something like this, once you’ve logged in:

- The “Settings” tab is where you can set up protection for your network, so click it, then select your just-configured network from the picklist; you should see something like this:

- Here, you can set a general level of protection (you’re probably going to want the default “Moderate,” but feel free to set it to something else and see how it works for you)
- No matter which level of protection you choose, click the “Customize” links for each filtering level to change the categories that it allows or blocks
- At bottom, the “Manage individual domains” section lets you add specific domains you want to always block, or never block
- Any domains you specify in this list will either be blocked or made available, without regard to your chosen Filtering Level or any category selections you’ve made in it
- Confirm OpenDNS is working by going to this URL: https://welcome.opendns.com/
- You should see this:

- One common site many folks in Connecticut add as a “Never block” domain, is the Connecticut Lottery (ctlottery.org). It’s classified as a “Gambling” site in OpenDNS, so under the default “Moderate” setting and with no other changes, it’ll be blocked
- You can find out what’s been blocked or allowed in the “Stats” tab
- Manage your OpenDNS account in the “Account” tab, etc.
Note: Now that you’ve configured OpenDNS on your entire network or on your device, and can manage it in the OpenDNS portal, you should be ready to go. Proceed to the “A Note About Browsers and Secure DNS” section, below, to see some additional comments about how your browser handles DNS lookups.
The section, here, about alternatives to OpenDNS (i.e. Cloudflare and Quad9) is offered as an alternative, in case you’re interested in knowing about them.
Alternatives to OpenDNS
There are free alternatives to OpenDNS. None of the following offers any online management tool like what OpenDNS provides, but all will block at least the worst Internet sites, and one offers an option to filter out adult content as well as malware sites.
Using Cloudflare DNS
Cloudflare offers free DNS filtering with two different choices you can make, based on very-broad predefined (not customizable) categories you’d like blocked. These options are called “1.1.1.1 for Families.” Here’s how to use them:
- Follow directions above (as for OpenDNS) to set it up on your home router, or individually on one or more computers
- In place of the OpenDNS server settings (each beginning with 208.67) use these numbers instead:
- To block malware, use 1.1.1.2 and 1.0.0.2
- To block malware and adult content, use 1.1.1.3 and 1.0.0.3
- For Windows 11 computers you’ve configured manually to use Cloudflare DNS, set the “DNS over HTTPS template” based on your choice of what to block:
- For malware blocking only, the template is: “https://security.cloudflare-dns.com/dns-query” (no quotes)
- For malware and adult content blocking, the template is “https://family.cloudflare-dns.com/dns-query” (no quotes)
- To test and see if Web filtering is working:
The selection of either malware blocking, or malware and adult content blocking, are the only ways to select the type of coverage you’re getting, in Cloudflare DNS. And that’s done based solely on the DNS server settings you enter in your router or computer.
Find more information on Cloudflare DNS (including IPv6 settings) here: https://blog.cloudflare.com/introducing-1-1-1-1-for-families/ and there’s an installation guide at https://developers.cloudflare.com/1.1.1.1/setup/
Using Quad9 DNS
Quad9 offers a service similar to Cloudflare DNS’s malware-blocking-only level. To set that up:
- Follow directions above to set it up on your home router, or individually on one or more computers
- In place of the OpenDNS server settings (each beginning with 208.67) use these numbers instead:
- 9.9.9.9 (Primary DNS)
- 149.112.112.112 (Secondary DNS)
- For individual-computer manual setups, the “DNS over HTTPS template” is “https://dns.quad9.net/dns-query” (no quotes)
- Interestingly, for Android devices only, Quad9 offers an app that will configure your smartphone or tablet to use their service for DNS. See it at https://play.google.com/store/apps/details?id=com.quad9.aegis&pcampaignid=pcampaignidMKT-Other-global-all-co-prtnr-py-PartBadge-Mar2515-1
- To test and see if Quad9 is active, go to https://on.quad9.net/
For more information on using Quad9 and how to set it up for specific computers and devices, go to https://www.quad9.net/support/set-up-guides (the bottom left side of this page has links to “Setup Guides” for different operating systems & devices). This page also includes IPv6 settings for Quad9.
A Note About Browsers and Secure DNS
Modern browsers, including Microsoft Edge, Google Chrome, Mozilla Firefox, Brave Browser, and more all have their own built-in capability of overriding your computer system’s DNS setting and using a secure DNS service of their own.
If you’ve set up OpenDNS on your computer either by configuring it from your router or manually setting DNS on it, you may find your browser using something else. You’ll have to be certain it’s using the system-wide settings you’ve specified. Alternatively, you can specify that your browser explicitly use secure OpenDNS as its own embedded option. Directions for all the major browsers are below.
Google Chrome
- Click the three-dot menu button in the browser’s upper right, then click “Settings”
- Click “Privacy and security” on the left, then “Security”
- Scroll down and click “Use secure DNS” to enable this feature if it’s not already on
- Change the “Select DNS provider” dropdown to “OS default” (to use your system-wide setting) or “OpenDNS”
Mozilla Firefox
- Click the three-line menu button in the browser’s upper right, then click “Settings”
- Click “Privacy and Security” on the left, then scroll down to the “DNS over HTTPS” section
- Under “Enable DNS over HTTPS using,” do either of the following:
- Change the “Choose provider” dropdown to “Custom” then add “https://doh.opendns.com/dns-query” (no quotes) in the box below that
- Change the overall selection to “Off” in order to use your system-wide setting
Microsoft Edge
- Click the three-dot menu button in the browser’s upper right, then click “Settings”
- Click “Privacy, search and services” on the left, then “Security” in the middle
- Scroll down and click “Use secure DNS” to enable this feature if it’s not already on
- Click in the box below “Choose a service provider” then do either of the following:
- Click “OpenDNS” which will change its contents to the OpenDNS DoH template URL
- Click “Use current service provider” to use your system-wide setting
Brave Browser
- Click the three-line menu button in the browser’s upper right, then click “Settings”
- Click “Privacy and security” on the left, then “Security” in the middle
- Click “Use secure DNS” to enable this feature if it’s not already on then do either of the following:
- Click the “Select DNS provider” dropdown and set it to “OS default” (to use your system-wide setting) or “OpenDNS”
Opera Browser
- Click the “O” menu at top left of the browser window, then click “Settings”
- Click “System” on the left (near the bottom)
- Under “Use DNS-over-HTTPS provider” do either of the following:
- Select “Click button for “ Enter custom DNS query URL” then add “https://doh.opendns.com/dns-query” (no quotes) in the box
- Change the overall selection to “Off” in order to use your system-wide setting
Vivaldi Browser
- Click the “V” menu button in upper left of the browser window, then click “Settings”
- Click “Network” on the left
- Click the “Enable DNS Lookup Over HTTPS” checkbox to enable it
- Change the dropdown immediately below that to “OS default” (to use your system-wide setting) or “OpenDNS”
About Internet Service Providers Circumventing DNS Settings
We’ve heard reports of ISPs circumventing your own DNS settings. It is possible for them to detect DNS traffic on its normal port (i.e. 53) and divert it to their own servers without regard to your own device settings. We’d advise calling your ISP and asking about this before taking any other action; if they’re doing it, they may stop, if you request it.
If your ISP does circumvent your DNS settings and also refuses to stop, the only surefire way of using OpenDNS is to implement DNS over HTTPS (aka DOH). This traffic is carried over a different port (443) and is encrypted, so the ISP has no idea what is being sent or received. You can either manually set DNS on a computer to use OpenDNS, according to the above procedure (including the DOH templates), or explicitly set your browser (whichever one(s) you use) also as shown above to use OpenDNS.
Back up to the Tech Advice Web Site